Robots: Future Overlords or Devices for Learning?
I had the privilege to guest moderate #TynkerChat on Twitter on March 27th and I thought I’d take this opportunity to answer the chat questions in more depth. It’s hard to share everything in 140 characters!
Why would we want to use robots to teach coding/computer science to students?
There is so much available to teach students coding these days, so why would we spend money on robots when there are free apps or websites available? There’s just something amazing about putting a robot into the hands of a student, whether they’ve had to build the robot or they’re just programming it. Seeing something like a robot do what you’ve told it to do helps students to understand that robots and computers aren’t magic. They need someone to tell them what to do! Also, providing the tactile, physical experience of a robot is a great way to reach many of our learners and it forces them to slow down and think about what they need to do in order to program the robot to do what they want it to do.
What robots are available for student learning and which do you use and why?
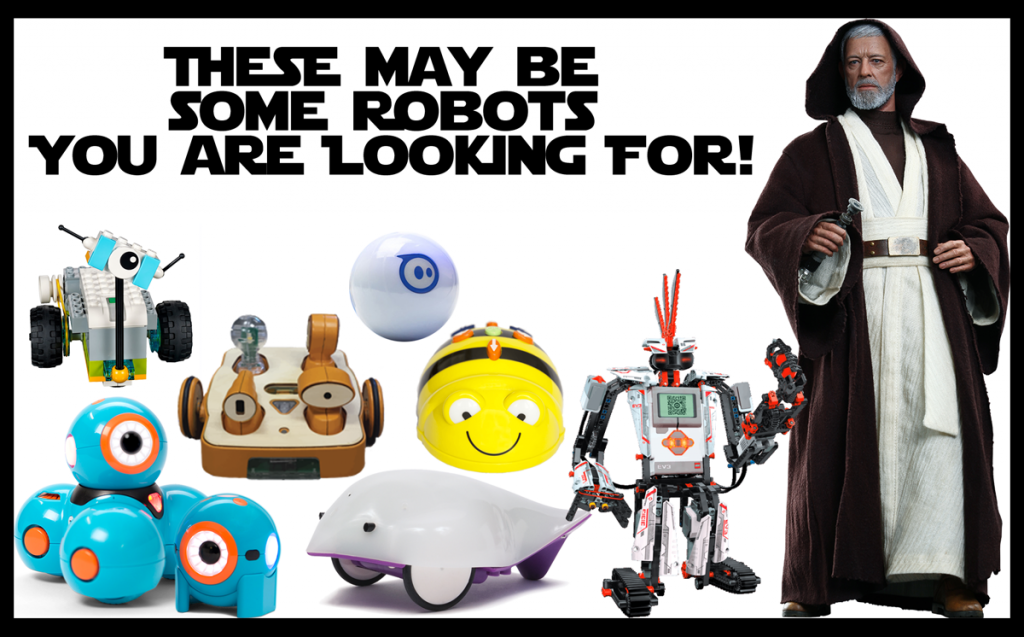
There are many options for robots for learning these days and there seem to be new ones every month. Here’s what my students have been using this year. I’m not going to go into detail about how to use these robots – that’s a whole different post!
- Bee-Bot & Robot Mouse: These are perfect for young learners and don’t require any device except the robot. They help to teach directions and sequencing and problem solving and collaboration in a physical way just by pushing buttons on the robot and they can be integrated into any curricular area.
- Cubetto: I bought this (and I only have one) to try some programming with our preschoolers. I haven’t used it with them yet but my kindergarten students have had fun with it. Cubetto comes with a story book and story mat which is a great introduction to how the robot works. Students program this robot with blocks that fit into control board and no electronic device is needed, so this is a very physical way to write and debug algorithms. If you’re looking for ideas of what to do with Cubetto, there are lots of ideas here.
- Dash & Dot: Dash and Dot are really versatile and very cute as well. My younger students have used them with apps that let the students “program” the robots by drawing a path for the robot to follow. My older elementary students use the Wonder Workshop coding apps and the Tickle app.
- Sphero: Some people think of Sphero as only for older students but I have used them with 1st grade through middle school. I highly recommend the Lightning Lab app (you can even export data from your programs on this one!), the Tickle app, and Tynker app for working with Sphero. If you have Chromebooks, you can even program Sphero on those as well. There are a lot of ideas for using Sphero on the Lightning Lab website.
Why these? Well, these are the robots we have and I have found them to be pretty versatile. They let my students learn not only computer science concepts but I can easily integrate them into other curricular areas as well. We also have a couple of mBots and some Lego WeDo that I’m hoping we have time to use this year and if not, there’s always next year! I would really like to get into more building of robots next year so I would love more mBots, more WeDo (original & WeDo 2), and Hummingbird Robotic Kits.
Teachers may often have one or only a few robots. How can they still be used effectively?
First, robots should not be a 1:1 experience. Robots should be used in pairs or small groups. Part of the magic of robots for educators is that students are not only learning how to write and debug programs to control a robot, they may also be learning or reviewing other curricular content, and they are learning to communicate and collaborate with one another and share roles and responsibilities.
For example, when my younger students work with Bee-Bot, they often work in groups of three where one person is the human robot, another is the coder/debugger, and the third is the robot programmer. The human robot actually walks the mat as the robot programmer tells them where to move. As they are doing this, the coder/debugger lays out coding cards or writes the code on an erasable white board. Once the human robot has reached the goal, the coder reads back the code and the robot programmer pushes the buttons on the Bee-Bot to program it. When the robot programmer presses GO on the robot, the coder/debugger keeps track of which command Bee-Bot is on so they can fix the code if needed. Students then switch roles so all students have the chance to perform all roles. For older students, there should also be assigned roles which might be things like the programmer, the robot handler, and the debugger. Again, students would switch roles regularly so all students have a chance to be responsible for all roles.
Even in groups of three, teachers may still not have enough robots for all students to be using them at the same time. Here are some ideas if that’s the case:
- Use robots in a small group center so that one or two robots can be used for an entire class as they rotate through the center. Yes, even for older students!
- Have some students using robots while other students are doing “robot programming” on apps and/or websites. It is still a good idea to pair students when they are doing these activities as well. Have one student be the driver (the person at the keyboard or holding the tablet) and the other is the navigator who helps to write the code (but does not touch the tablet or keyboard) and debug any problems. Again, students should switch roles often. I like to have them do this either when they have solved a level (in a puzzle type app) or on a specific time schedule, like every 5 minutes. Some “robot programming” apps and websites are listed below. There are other apps available beyond what are listed here but these should get you started.
- Bee-Bot Emulator: This is great if you have Bee-Bots because you can often have the students working online doing the same activity as those using robots except the students using the emulator are programming a virtual Bee-Bot. For example, if you are having students program Bee-Bot to the beginning letter sounds of words, you can give both the students working with the real Bee-Bot and the students using the emulator the same picture cards so they can be navigating on a ABC mat to the beginning letter sound in either case.
- Bee-Bot App: If you have iPads, this is a good app to use when students are working with Bee-Bot since in the app they are also programming a Bee-Bot. Again, pair students and have both a navigator who lays out coding cards or writes the program on an erasable white board as the driver figures out the code in the app. This app does not keep track of the commands that are entered so writing down the program is important in order to debug.
- Bits & Bricks: If you are using Lego WeDo 2 or if your students just like Legos, this is a great companion website to use since it features Bit the Robot who is very similar to one of the robots you might build with Lego WeDo 2.
- RoboBlockly: RoboBlockly is a web-based robot simulation environment that lets students program virtual Linkbot and Lego Mindstorms NXT/EV3 robots.
- RobotMesh Studio: Program a virtual VEX IQ robot called Mimic.
- NASA Rover: Program a virtual NASA Rover
- RoboMind Academy: Program Robo through a series of levels.
- StarWars Hour of Code: Program BB8 and R2D2 through a series of levels and create your own game at the end. Can program either with blocks or Javascript. Really fun to do if you happen to have a Sphero BB8 robot that you can then program with the Tickle app when you’re done.
- Lightbot: Lightbot has apps available for most devices and a Flash version on the web. All of these feature a small robot that you program through a series of levels.
- Fix the Factory: This game use Lego Mindstorm robots which go through a series of levels to fix a factory and works on iPads and Android tablets. There is also a web version but it won’t run on the Chrome browser or on Chromebooks.
Considering the cost of robots, how can we help more teachers & students have access to them?
In order to get robots, you may need to do some fundraising. Donors Choose is the most well known option available and is a great one to try if you are a public school teacher. Unfortunately, I teach in a private school so DonorsChoose is not an option for me but here are some crowdsourced fundraising sites that private school (and public school) teachers can try:
- Digital Wish: Dash & Dot are available here!
- Pledge Cents: Finch Robots, Hummingbird Kits, LittleBits
- Adopt a Classroom
Some schools and districts now have robot lending libraries. If yours doesn’t check out the Finch Robot Loan Program and if you’re a member of CUE, check out the CUE STEAMPunk Mobile Labs.
So, are you using robots with your students? Which ones?
Leave a Reply