Year End Reflections #2: Monster Project

Another class and another collaborative project – this time, it was my 3rd grade class and they were participating in the Monster Project. I felt this project was a lot of fun for the students and they learned quite a bit about being detailed with their writing. I really appreciated the lesson plan ideas on the Monster Project wiki and used many of these with my class.

Preparation

I began this project by having the students watch the Schoolhouse Rock video Unpack Your Adjectives:

The video was a fun review of adjectives and the students enjoyed it. Then, we read the book Many Lucious Lollipops by Ruth Heller and created a favorite food adjective web in PowerPoint.  Once these were completed, I took two of them and read just the words describing the food to see if the students could identify the food – one of them was easy to identify and the other was more difficult. We then took some time to figure out what words could have been used to make it easier to identify the second food.

Drawing The Monsters

The first drawing class started out with the book Go Away Big Green Monster by Edward R. Emberley and instructions on how to draw their monster. We discussed how it would be easier to describe their monster and for their partner to re-draw their monster if they used simple shapes like circles, rectangles, triangles, etc. Even though the students were told to keep their monster simple, some of the students used non-standard shapes and some of the fancier paint brushes in KidPix. I had planned two class periods for the drawing portion of this project but we actually used more time than that due to absent students and accidental saving of a blank picture on top of a completed monster.

Describing The Monsters

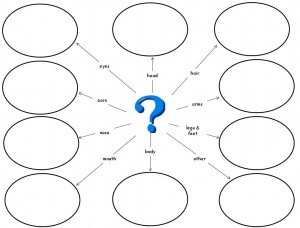
The first step in describing the monsters was to create an adjective web for their monster by coming up with describing words for each monster body part. I created a template in PowerPoint and printed this out for student to use with their monster.

Monster Template

Some of the students completed this quickly while others had a more difficult time with it. It took two class periods for all of the students to have this completed. One thing I noticed in this process is that in some cases it would have been better for the student to describe their monster in a way that didn’t include using adjectives. For example, one of my students drew a monster that looked like a wave coming out of the water. He described it with adjectives like blue and curved, etc. but it would have been much easier to redraw if he had just said it looks like a wave coming out of the water. Next year, I will emphasize that sometimes you can describe things not only with adjectives but in other ways too.

I then added a Monster Prompts template to each student’s computer and they used this in Word to write their monster descriptions. This step took more time than I thought it would due to student absences, lack of Word and keyboarding skills and difficulty in the actual writing process. After doing this in the lab, I feel that the actual writing process should be done with the classroom teacher instead of at a computer. It is difficult for the younger students to compose in Word. Next year, if we do this project again, I will have the students write their descriptions with their classroom teacher and just type them during their time in the computer lab. I have already mentioned this to the 3rd Grade teacher for next year.

My Turn

After the students were done with their monster creation and descriptions, I combined all of the descriptions into one Word document and exported all of the pictures out of KidPix as JPG and resized them according to the instructions on the Monster Project wiki and then added our descriptions and our monster pictures to the wiki and updated the main page on the wiki to reflect where we were in the process. I think this was a really great idea on Anna and Ann’s part so that you could easily tell where your partner school was. The timing between our two schools was pretty good in getting the project completed and online.

Drawing Their Partner’s Monster

Before the students redrew their partner’s monster, I printed out two monsters from last year’s project along with their descriptions. I purposely picked one monster that was described really well and one that did not have a really great description. We then went into KidPix as a class and drew the monsters from their descriptions only and crossed out each sentence of the description as we went. The students were amazed at the monster that was described well and how it matched the original. They were frustrated with the second description because it was missing information on colors and some of the body parts. This is when I saw the light bulb truly go off for them. Some of them realized at that point things they might have left out of their own descriptions or ways they could have drawn their monster to make it easier for someone else to recreate. Next year, I will do this same thing before we ever draw the monsters and maybe even repeat it before we write the descriptions.

Each student was given the description of a monster drawn by a 3rd grade student in Mintot, ND. They were really excited to try to draw their partner’s monster. Some of them discovered that the descriptions were detailed and made it easy to draw what they thought the monster should look like. Others discovered that things like the color of their monster and other important details weren’t there. Good descriptions or not so good descriptions, everyone finished their redraw within a few class periods and then I uploaded the redrawn monsters to the wiki.

Reviewing & Reflecting

My students were all really excited to see what the students in Minot, ND had drawn from their descriptions and to see what their partner’s original monsters really looked like. We took two classes to view these and I heard a lot of “But they didn’t draw what I said” and “Wow that looks like my monster” and “Hey that’s pretty close”. After we had looked at them all, we talked about why there were differences especially in colors. It’s hard for 3rd graders to understand that even though your blue and their blue are different that doesn’t mean that they drew it wrong. It could be that they used a different drawing program and the blues in there are just different than the blues in KidPix. We spent some time reviewing some of the monsters and descriptions to see where things had gone right and where they had gone wrong.

Each student then used PowerPoint to write and then record their reflections on the project. They had to answer the following questions or complete the following sentences:

1. What did you enjoy most about the Monster Project?
2. Was there anything you didn’t like about the Monster Project?
3. I did a good job describing my monster’s
4. I used describing words like
5. It was difficult for my partner to draw my monster because
6. If I could do this project again, I would
7. What words made it easy to draw your partner’s monster?
8. What words were missing or wrong that made it hard to draw the monster?
9. What do you think they should have added?

This step in the process took 3-4 classes to complete because the students had to think about their answers and write them in complete sentences. After they had their written answers completed, they had to actually record their answers in PowerPoint.

Sharing Reflections Online

I then combined these into one big presentation but I wanted to just take the recording from the first slide for each student and put them all on one slide and let people click on the voice they wanted to hear and then continue through the other slides. I created this in PowerPoint and it worked great. I typically upload and share PowerPoint presentations in SlideBoom because it keeps voice and transitions and animations, etc. This time it didn’t work, however, since the ability to click on the speakers went away when I uploaded the presentation which meant you couldn’t hear what the students had to say – so it was on to Plan B for this one.

Aha, I thought, I’ll use VoiceThread since I had read you could upload PowerPoints and I hadn’t ever tried that. I haven’t used VoiceThread much this year. I currently only have a free account and I used to have all of the computers in the lab logged in to the same account using different identities. Since that’s not an option anymore I just didn’t do much with VoiceThread after the first semester this year. I decided to see if it could handle what I needed by uploading the PowerPoint presentation. Sadly, it couldn’t since all I ended up with was the images and they all had speakers on them since my students had inserted recorded sound on each slide. So back to the drawing board but I knew there had to be a way to get the images and recorded information from the PowerPoint into VoiceThread so here are the steps I used to transfer my PowerPoint presentation to VoiceThread:

1. Save the presentation as a web page. This exports all of the sounds files for me. It exports other things too but I was interested in getting the sound files.

2. Take all the speakers off the slides and then save the presentation as jpg images. This saves all my slides as individual images.

3. Upload all the images to create a new VoiceThread. It might be a good idea to rename the files before uploading since it names them slide1, slide2, etc. which means slide2 will come after slide 10 and not right after slide 1. I didn’t and just reordered them in VoiceThread.

4. Using each of the student identities that I already have under my account, upload the sound files as comments on the slides in VoiceThread. I did change the pictures for each of the student identities to match the Monster Project since this class had not done any other VoiceThread project this year.

Voila! A VoiceThread from a PowerPoint including the recorded information on the PowerPoint.

Ann Oro had also created a VoiceThread for reflections from the teachers on the project and I spent some time adding my reflections to that too. I am interested in hearing what everyone else has to say about the project. One slight disappointment I had with the project was the fact that we didn’t get to Skype with our partner class. We were attempting to set this up but they were out of school about a month before we were and I hadn’t realized that fact and we didn’t get this set up before they were out for the summer.  I think this is a wonderful project to teach the students about descriptive writing and to get teachers involved in an online collaborative project.
Year End Reflections #1: Time Zone Experiences

I am having my older grades complete end of year surveys for me about what they liked and didn’t like this year in the computer lab and what they hope to learn next year. So, as they reflect, I am going to write a series of posts reflecting on some things that I think worked … or didn’t work.

I wanted each of my classes to participate in some kind of collaborative project this year and for 5th Grade I chose the Time Zone Experiences project. I thought this sounded like an interesting project and one that would be challenging but not too difficult for my students to complete.

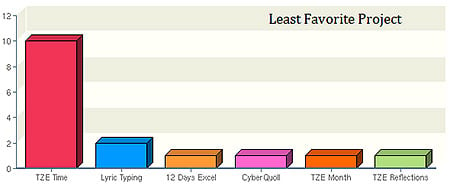
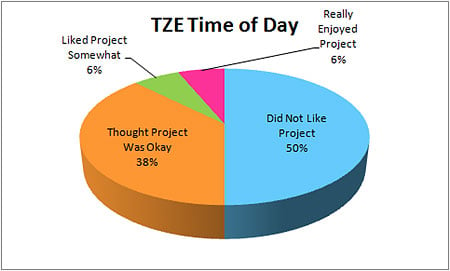
Unfortunately, this did not turn out to be the case. For some reason this became the project that just would not end! We started working on this in January and the final reflections were completed just yesterday! It was not a popular project with my students either as you can see from their choice of the least favorite project of the year on their year end survey. All three major portions of the project ended up making the least favorite list with the Time of Day portion of the project a resounding winner … or make that loser.

So, what happened? How did a project that I think sounded like fun and easy end up on the least favorite list and take so long to complete?

Wiki Issues:

This was the first ever wiki project for this class and it required that they maintain two different wikis – our class wiki and the Time Zone Experiences wiki. This immediately set up problems as the students had difficulty remembering where they were or where they were supposed to be. To further add to the confusion, they had their own logins on our class wiki and had to be logged in as me on the Time Zone Experiences wiki since they were not members of that wiki. Also, even though, we had a few classes on how to edit a wiki, I don’t believe that I spent enough time on this. In hindsight, I think spending a few more classes on how to edit a wiki and only having them edit one wiki would have limited some of the confusion. We also ran in to wiki limitations when multiple users tried to edit a page at the same time. We did have a class on this issue but I think with all of the new information being thrown at the class this got lost with many of them and caused some frustrations.

How It All Began:

After introducing wikis and having a few classes on how to edit wikis and creating some test pages on the wiki, I introduced the Time Zone Experiences project. I started out by showing the students the wiki and using Google Maps to show them where the various schools involved were located. We then had a lesson on Time Zones and GMT and discussed how to calculate the difference in time from GMT to Pacific Standard Time (since this is the time we were using). The students even completed a short quiz on this information and seemed to grasp it. I also posted a Time Zone Chart in the computer lab so they could refer to it when working on their assigned time to make sure they had the conversion correct. After the Time Zone lesson each student completed a short survey about when they go to bed and when they wake up so we would have that information for use on their time pages.

Time of Day:

Once the introductory lessons and the survey were completed, each student was assigned a GMT time. They were told to convert that to Pacific Standard Time and to check the chart in the lab to make sure they had the correct time. I did spot check the students I felt would have problems with the conversion to make sure they had the correct time but did not check every student. I should have since two students ended up doing the incorrect time and had to redo their work. Note to self: Next time check every student just to be sure to save time and frustrations later!

After they had converted GMT to Pacific Standard Time, they were assigned to write a few sentences about what happens at that time of day on the wiki page for their time. They were told to include: The results from the survey they had completed if they had a waking up or going to bed time, What they would be doing in school if they had a school time, and What they would be doing at home if it were the weekend or a non-school time.

After their written portion was complete, they were assigned to draw a picture in KidPix illustrating something about their time of day, export it and add it to their page on the wiki. Even though we had done exporting of pictures from KidPix before, this proved to be another stumbling block. I wonder if having step-by-step instructions for these things means they are not retaining how to do them?

Once their page on our computer lab wiki was complete, they were told to post that same information on to the Time Zone Experiences wiki. This is where we ran in to the where am I issues and how should I be logged in issues and the conflict issues with editing the Time Zone Chart page of the Time Zone Experiences wiki. Eventually, I just had them edit the actual time pages on the Time Zone Experiences wiki and I copied and pasted their written information on to the Time Zone Chart page.

I tried to make this as easy as possible by having step-by-step instructions online where they could read the instruction and click the appropriate link and then complete whatever needed to be done. These just did not seem to work and after discussions with the class, we ended up with printed instructions where they could cross out instructions as they went. Even with this, steps were missed and there was a lot of back and forth to get the time pages completed. When this project started, I thought it might take them a month to complete their time pages on both wikis but this is the portion of the project that just dragged on and on. In hindsight, I think I should have repeated the wiki lessons and Time Zone/GMT lessons again or addressed these concepts again in a different way.

So, how did the students feel about this after they had finally finished it? Did they like the end result? Not so much according to their end of year survey:


Months:

Are you still with me? Once the students were done with their Time of Day pages, they moved on to an activity about each month of the year. For this portion of the project, some of them were paired up and others worked individually. With only 12 months in the year, it wasn’t possible to pair everyone up though I think that those who worked in pairs enjoyed this portion of the project more than those who didn’t work with a partner.

For their assigned month, each student or student pair had to write a script about their month which included:

  • What happens at the school during that month (if applicable)
  • What sports we play at school during that month (if applicable)
  • Average temperatures and rainfall during that month
  • Holidays we celebrate at school or they celebrate at home during that month. They researched the holidays at a site that included real types of holidays and “fun” type of days for each month and they were allowed to include some of these fun days if they wished.
  • What they do during that month

Once their script was finished, they drew a picture in KidPix to illustrate something that happens during their month and again they had to export this. Once both the script and the picture were complete, they created a slide in PowerPoint with a title of their month, their picture and a recording of their script. I then combined these into a single presentation and exported the audio and added it to each month page of the Time Zone Experiences wiki.

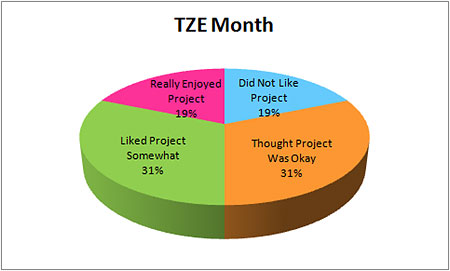
This portion of the project actually went much smoother than the Time portion. Yes, there were a few glitches and yes, some of the students did a better job with their script than others but this did not take too much time and the resulting presentation is very fun. Did the students think this part of the project was better? Still not a resounding success but definitely better:

Reflections:

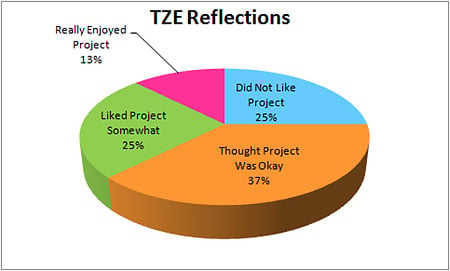
The final portion of this project was to reflect on the project. I have not done much with reflections on projects in the computer lab but I think they are a great idea and a nice way to wrap up a project. First, the students spent some time reading the contents of the Time Zone Experiences wiki for the other schools and then they typed responses to five questions in Microsoft Word. Once they had this completed in Word, they logged in to our wiki and copied and pasted their answers on a discussions tab on the wiki. While some of the students did not answer in full sentences as directed, this portion of the project was completed fairly quickly. The only confusion seemed to be how to download the Word document and how to tell which question they were answering on the wiki. So, what did the students think of the reflections portion of the project?

Final Thoughts:

I think most of my students missed the point of this being a collaborative project with other schools and that is one of the main points I wanted them to get. Yes, they did visit the Time Zone Experiences wiki. Yes, they did look at and listen to the information posted by the other schools. Still, I don’t think it felt collaborative to them. Why is that? I think it might be because even though we were all editing the same wiki, it didn’t happen at the same time and there wasn’t any feedback to them about their contributions. I wonder if it might be a good idea to have the students Skype or chat with the other schools before they really started working on the project or even at some other point during the project. I think asking a student across the country What time is it where you are right now would make the information more real than looking at it on a chart on a wiki.

I know my students really struggled with this project for a variety of reasons. I sometimes wonder if I should have just stopped the project at some point rather than trying to finish it. If I ever do this project again, here are some things I would do differently to hopefully make it run more smoothing:

  • Spend more time up front working with editing wikis so the students were not trying to learn how to do this at the same time as trying to complete the project
  • Spend more time up front working with Time Zones and GMT and time conversion and check that each student has converted their time correctly before they get too far into the project
  • Create video tutorials on how to edit wikis, how to export pictures from KidPix, etc. and have these available for student viewing for those visual learners
  • Have the students maintain only one wiki
  • Have the students work in pairs on the Time of Day portion. It think it could work better to have a pair work on two times rather than each student work individually.
  • Give the students more choices in how they document their time. I think this could lead to a higher interest from the students but could backfire and result in more frustrations.

The bottom line, I still think this is an interesting project and one that could be a favorite of my students – maybe next year.

Always Have a “Plan B”

More and more I rely on the Internet and the resources that can be found there but that can sometimes be a problem when the Internet isn’t available for some reason. This week is World Math Day and so I had planned to practice on the site with three of my classes today. You’ll notice that says planned – when I got to school today I was told that the Internet wasn’t available. Okay, we sometimes have problems that just require a reset of some things but that wasn’t the case today. Today, there just was no access from the cable. I’m still not sure what was wrong and hope it’s fixed tomorrow but I’ll have a Plan B ready just in case it’s not!

So what were my plans and what did we actually end up doing?

2nd Grade:

The Plan was to have them log in to the World Math Day site and customize their avatar and play the game so they knew how it worked. I don’t see 2nd Grade on Tuesday or Wednesday (the actual World Math Day) so I wanted to get them excited about using the site so they could play at home. Plan B was Jumpstart 2nd Grade! We don’t have the latest and greatest version of this game (and couldn’t install it if we did because of disk space issues) but even the older versions have good grade level activities and the students love it. I did send home the letter I had crafted at home that said we tried out the World Math Day site and encouraged parents to have their child participate in World Math Day from home. I just added a hand written note that we didn’t actually get to have our practice due to Internet issues. Note to self: Don’t just email these things to yourself, put them on a flash drive you bring in too!

3rd Grade:

The Plan for most of the 3rd Graders was the same as 2nd Grade – we were going to try out the World Math Day site. I also don’t see 3rd Grade on Tuesday or Wednesday so this was going to be the day that I could show them how this worked so they could actually participate from home. I did send home the letter but we didn’t get to practice. Plan B was installing the software program, Jumpstart 3rd Grade, and working in that – most of them anyway. A few were finishing up something in Microsoft Word. They’ve been asking about using this all year so this gave me the chance to get it installed and to review how to handle CDs and install software with them.

6th Grade:

The Plan for 6th Grade didn’t involve World Math Day – whew, right? Well, yes and no, 6th Grade was going to continue their Keyboarding Lessons. These typically start with a 2-minute timed test and guess where those are? If you said, on the Internet, you win! Luckily I had brought a timer to the lab a week or so ago so Plan B was to create my own timed test. The students typed the alphabet as many times in Microsoft Word as they could during a 2 minute period. Then they examined what they typed for errors and counted how many of those they had. They then used the Word Count function in Word to see how many characters they had typed. They subtracted their errors from that and then divided by 5 to get the number of words they had typed – typing programs typically count a word as 5 characters. Then, they divided that result by 2 to get the number of words they had typed in one minute. Yes, they could have divided by 10 but I wanted them to see the steps and to know that 5 typed characters equals one word. They really enjoyed typing the alphabet for their speed test! Each Keyboarding Class ends with 10 minutes of some keyboarding game that is typically on the Internet. Instead of going to the Internet, they spent their game time playing the games in Mavis Beacon instead.

4th Grade:

The Plan for 4th Grade was again World Math Day since I don’t see 4th Grade on Tuesday or Wednesday. So, on to Plan B, and like 6th Grade, 4th Grade continued their Keyboarding lessons. I had to make the same modifications to the Keyboarding lesson that we usually do but all went smoothly and they enjoyed the games in Mavis Beacon. I also sent home my letter about World Math Day along with their logins and they were excited to play at home to try to help set a new world record. I hope they’re able to do so.

And, now I’m working on my Plan B for the rest of the week … just in case. There’s a current discussion on the Elementary Tech Teachers Ning about what to do when the Internet is down. If you are technology teacher in Elementary School (or even Middle School), this is a great Ning with loads of ideas and help. Join it!

So, what do you do in the computer lab when the Internet is down?

Snow in California

The Snowflake Bentley January activity on the Winter Wonderland Wiki sparked an idea for me for grades beyond 3rd. As I was researching Wilson Bentley and snow to create lesson plans for Kindergarten through 3rd grade who are participating in the Winter Wonderland project, I ran into a site by Rick Doble. As part of his work, Rich has exhibits of snowflake images which he digitally altered from Wilson Bentley’s snowflake pictures. This became the jumping off point for the projects I did with my 4th & 7th Grade classes.

First, I read the book Snowflake Bentley by Jacqueline Briggs Martin to each class. This is also available in a video format. After reading the book each class created a timeline of Wilson Bentley’s life. 4th Grade used the PowerPoint template available on the Winter Wonderland Wiki and 7th Grade created a timeline in Microsoft Excel.

After the timelines were complete, the students then download one or more of Wilson Bentley’s snowflake pictures from the Snowflake Bentley web site. Using the filters and effects in PhotoFiltre, the snowflake pictures were digitally altered to create something new from Wilson Bentley’s image. This could be done using other programs such as Gimp (Open Source) or Paint.NET (free image & photo editing program) or Photoshop or many others. We have PhotoFiltre installed on all of our computers because of a project I did with it last year so we used this application.

Once the snowflake images were complete, each student created a slide in PowerPoint with their image(s) and then wrote and recorded a poem to go with their images. I then combined all of the slides into a single PowerPoint presentation for each grade which I uploaded to SlideBoom. Here is the finished 7th Grade project:

I feel this was a really successful project overall. Since timelines in PowerPoint and Excel were new concepts, they kept the students engaged and they all enjoyed finding pictures to illustrate their timelines. The students all seemed to enjoy using PhotoFiltre and I didn’t get too many “how do I” questions during their use of it. They were very willing to just try things to see what it did especially since there are multiple levels of undo available. Most of the students also enjoyed creating their poem though a few did struggle with this especially in 4th grade where I required a Cinquain poem. This was also an easy introduction to narrating a PowerPoint presentation since it was a single slide that needed to be narrated. I would love to get better quality microphones for all of the computers so that the sounds levels could be consistent on projects like these.

Okay I admit it – I LOVE PowerPoint!

Yeah, I know, it’s so not Web 2.0 but I find it so useful on so many levels. Here are just a few things we’ve done or are doing using PowerPoint:

Math Books: I first saw this used by Kevin Jarrett in the fall as a Pumpkin Math Book and adapted this for my own use with my Kindergarten through 2nd Grade students. Since that time I got involved with the Winter Wonderland project and adapted this yet again into Penguin Math Books. You can download the templates on the Activities page of the Winter Wonderland project. While you’re there, check out the Penguin Glyph too – that’s also done in PowerPoint!

Keyboarding for Kindergarten: Collins Trott has designed a keyboarding curriculum for Kindergarten students called Trott’s Typists which uses Kidspiration focusing on learning letters and starting letter sounds as well as finding keys on the keyboard. We don’t have Kidspiration but I’ve adapted her idea into PowerPoint and now my Kindergarten and 1st Grade students are using this on a weekly basis. So, if you don’t have Kidspiration, don’t let that stop you – adapt those Kidspiration ideas into PowerPoint!

Idea Webs: My 3rd Grade students are involved in the Monster Project and one of the lesson plan ideas for that project involves using a word web in Kidspiration. Once again I took the idea and created a web template in PowerPoint that my students are using.

Internet Safety Posters: Using the ability to export slides as images, my 4th and 5th Grade students designed Internet Safety Posters in PowerPoint and then exported them as images.

Animoto Videos: Taking the concept used in the Internet Safety Posters, my 8th Graders designed a series of slides about Cyber-Bulling which were exported as images and then uploaded to Animoto to create Cyber-Bulling PSAs. An added benefit of this is that it gets the students to think of PowerPoint as a visual medium and not as something with just a bunch of bullet points.

Presentations: Yes, I actually do have my students use PowerPoint to make presentations, too. My 6th Graders have just finished up Christmas Around The World narrated presentations. You will find few (if any) bullet points on these. What you will find is lots of visuals and recorded audio to narrate the slides.

Poetry Books: In the same vein as above, my 4th Grade students and 6th Grade students are creating a slide in PowerPoint which will contain snowflakes that they have digitally altered from Wilson Bentley’s photographs and a poem that they have written about winter or snow or snowflakes or Bentley that is being recited by the student that wrote it. These are being combined into one presentation for pictures and poems by the students.

Bottom line, PowerPoint isn’t just for the dreaded Death By PowerPoint presentations anymore! I do promise to train anyone and everyone who will listen not to make these mistakes:

What are some ways that you use PowerPoint?